Site Evaluation and Groundwork
Soil Analysis and Bearing Capacity
No concrete slab construction is safer than the soil it rests on. The ground beneath the site dictates the entire project’s viability. In South Africa, profiles vary dramatically. A plot in Gauteng may sit on dolomite, while a coastal site in KwaZulu-Natal presents soft, sandy fill. Ignoring these conditions invites structural failure.
Bearing capacity determines how much load the slab can safely transfer. Geotechnical engineers perform tests to measure this, and they look at:
- Soil type and particle size distribution
- Moisture content and plasticity index
- Presence of expansive clays or organic material
For durable concrete slab construction, subgrade preparation determines long-term performance. I have seen proper soil analysis reveal whether compaction suffices or if imported fill is necessary. This groundwork prevents the eventual collapse of what was meant to be permanent.
Drainage and Water Table Management
In South Africa, the water table can rise several metres within a single rainy season. That reality shapes every responsible concrete slab construction project. Water follows gravity, and a poorly drained foundation becomes the lowest point.
Site evaluation must therefore include groundwater assessment. I have stood on bone dry plots in winter that turn into marshland by March. The engineer needs to know where the water sits, how it moves, and what the seasonal extremes look like.
For drainage and water table management, the following matters:
- Stormwater runoff direction across the site and neighbouring properties
- Depth to the seasonal water table
- Soil permeability, which determines whether agricultural drains or sumps are needed
Dewatering may be required before excavation, and permanent perimeter drains often protect the slab. Ignoring these elements turns a concrete slab construction into a failed foundation. Proper groundwork keeps the building dry, year after year.
Excavation and Subgrade Compaction
Site evaluation goes beyond measurements. The plot’s history matters. Old foundations, buried rubble, or forgotten septic tanks can undermine the best engineering. I have watched a pristine field conceal a brick-lined well until the excavator uncovered it. That discovery halts the works and tests everyone’s nerve!
Before breaking ground, confirm these details:
- Access for concrete trucks and machinery
- Location of underground services
- Safe excavation slopes for the depth required
Excavation to the specified depth is non-negotiable. Overdigging leaves soft pockets. Underdigging leaves unstable material. For concrete slab construction, subgrade compaction determines the outcome. The soil must be rolled in thin layers with careful moisture control. Too dry, the particles refuse to lock. Too wet, the soil loses its load-bearing strength. A nuclear density gauge verifies the compaction. This quiet, unglamorous work demands patience and honesty. The entire concrete slab construction depends on what you prepare here.
Base Layer Selection (Gravel and Crushed Stone)
The ground beneath a site often keeps its own counsel. I have seen a field, perfectly level and promising, hold a secret that no survey could reveal until the steel teeth of the excavator bit deep. That is why we read the land before we lay a single stone, and why the selection of your base layer is a decision that deserves more than a passing glance.
Once the clay is beaten into a firm, unyielding cradle, the conversation turns to gravel and crushed stone. This is not merely a blanket to cover the dirt. It is the bloodstream of your entire concrete slab construction, a layer that must wick moisture away from the slab while offering a rigid, unflinching platform for the pour. The aggregate you choose must be angular, not round. River pebbles, smooth and lazy, will simply roll and settle, allowing cracks to trace their way through your floor. Crushed stone interlocks, each jagged edge gripping its neighbour to create a lattice of undeniable strength.
A robust base layer performs several critical functions. Consider the following checklist before the trucks arrive:
– Specify stone that is clean and free of dust, as fines hold moisture.
– Choose a graded stone that allows for proper drainage and compaction.
– Verify the depth of the base, which should match the engineer’s calcs.
Laying the stone is a task of deliberate pacing. You do not dump and spread. You build the layer in stages, wetting it down and rolling it until the surface is as unyielding as the subgrade beneath it. The final grade must be true, a smooth plane that gives the formwork a perfect guide. A sloppy base means a slab that sags, and that is not a chance any builder should take. This bed of aggregate is the final chapter in the site’s preparation, a silent promise that the earth will not shift, settle, or betray the concrete that will soon rest upon it.
Structural Design and Material Selection
Determining Optimal Slab Thickness
Calculating slab thickness is where engineering theory meets on-site reality. For South African conditions, the difference often comes down to reinforcement and concrete strength, not guesswork. In my experience, a 100mm slab rarely survives heavy vehicle loads, but it works perfectly for a garden shed.
Material selection in concrete slab construction changes everything. Higher-grade concrete, like a 30MPa mix, allows thinner slabs than a weaker mix. Add steel mesh or rebar, and you can reduce thickness by 15% without cracking. Here is what I weigh up before ordering a single cubic meter:
- The intended load, whether foot traffic or forklifts.
- The span between supports, if any.
- The edge constraints, like wall or beam support.
A thicker slab costs more upfront, but it prevents costly repairs later. Ultimately, the optimal thickness balances budget, materials, and function. Good concrete slab construction starts with honest calculations, not shortcuts!
Concrete Mix Proportions and Strength
The strength of a slab is decided long before the truck arrives. In concrete slab construction, the water-cement ratio is the decisive factor. Too much water creates a porous mass, too little makes it unworkable. I have inspected 40MPa slabs that crumbled because the mix was overdosed with slump aid. The aggregate gradation matters equally. Larger stone means fewer voids, but it also demands more skill during compaction.
A proper mix design follows a logic of its own. Consider these variables!
- Cement content and type, whether CEM I or blended.
- Water purity and temperature.
- Admixtures for slump retention.
Each interacts with the next. In South Africa, the commercial pressure to save on cement often leads to structural failure. What survives is the mix that adheres to its limits. Strength is not a number on a certificate, it is the result of these careful proportions.
Reinforcement: Rebar versus Wire Mesh
There is a certain reassurance in the clatter of a steel delivery on site. It sounds like a promise. In the world of concrete slab construction, the question of reinforcement is where structural theory meets the unforgiving reality of the supplier’s yard. You can have the perfect water-cement ratio, but if you place a single sheet of flimsy mesh in the middle of a 200mm slab, you are essentially paying for decorative netting.
Rebar is the workhorse. It provides the tensile strength that concrete lacks, but it only works if you place it in the right plane. The difference between a slab that cracks and one that holds often comes down to the simple decision between a robust cage and a flat sheet. In South African residential work, the call is usually made on price, not physics.
Consider these practical differences:
– Rebar requires chairs and ties, which takes labour hours and a foreman who actually checks the spacing.
– Wire mesh is laid in a day, but it is easily trampled into the mud by the crew pouring the concrete slab.
– Mesh is prone to being rolled out and left flat, which means it sits far below the neutral axis where it does nothing.
– Rebar, when well-tied, holds its position during the pour and offers real structural continuity at laps.
The secret is placement. A slab on grade is mostly about controlling shrinkage, not holding up a skyscraper. For that job, a well-propped sheet of mesh is often sufficient. But if you are pouring over expansive clay, or if there are going to be heavy point loads from wheel jacks or container legs, skip the mesh entirely. Use the bar. Every structural engineer I have ever argued with will tell you the same thing: the cost of the steel is small, the cost of the repair is not. Get the cover right, get the laps right, and your concrete slab construction project will survive the first rainy season. Otherwise, you’ll be looking at hairline fractures that look like a roadmap to nowhere.
Vapor Retarders and Moisture Barriers
Moisture accounts for over 70% of concrete slab construction complaints in South African warehouses. That statistic should unsettle you. A vapour retarder sits directly beneath the slab, stopping capillary rise from the subgrade. A moisture barrier, by contrast, is a heavier membrane that blocks liquid water and vapour under high hydrostatic pressure. The distinction matters when the water table rises after summer rains.
The choice between a 250 micron polyethylene sheet and a peel and stick membrane depends on the groundwater regime. Cheap rolls tear during mesh placement. Seams must overlap by 200mm and be taped. Otherwise, the slab breathes, the screed curls, and the floor coating delaminates. Vapour transmission is a slow, silent failure, one that surfaces only after the warehouse is operational.
Insulation and Radiant Heating Integration
More concrete slab construction failures stem from structural design oversights than from weak concrete. The aggregate must be non-reactive with the cement, and the water-cement ratio must stay below 0.5. Steel reinforcement belongs in the tension zone, not floating near the surface. These choices are structural commitments, not decorative details.
Insulation and radiant heating integration alters the slab’s thermal behaviour. In South African highveld conditions, a slab without insulation loses heat directly into the subgrade. A 50mm extruded polystyrene layer prevents that loss. When embedding radiant heating pipes, place them above the insulation and below the reinforcement. That layout distributes heat evenly. I check these items on every project:
- Pipe spacing between 200mm and 300mm centres
- Water temperature below 50 degrees Celsius
- Expansion joints detailed so they do not sever heating loops
These choices define the concrete slab construction as a system, not a single pour.
Formwork, Reinforcement, and Utility Placement
Building and Aligning Perimeter Forms
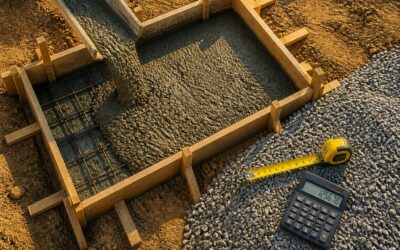
In the world of concrete slab construction, the difference between a masterpiece and a leaning tower of mediocrity often comes down to the wooden skeleton you never see. Before a single truck arrives, your perimeter forms must be more than just level. They need to be rigid, straight, and locked down against the immense pressure of wet concrete. If you settle for flimsy stakes and warped lumber, the slab will bow, and your walls will have a permanent, awkward lean that no amount of interior design can fix.
Once the forms are set, it is time to give your slab its internal skeleton. The reinforcement grid is only as good as its positioning. If the rebar sinks to the bottom of the mix, it acts more like a rusting floor mat than a structural member. You need to support the grid with durable chairs or spacers to keep it suspended in the middle third of the slab, where it can actually do the heavy lifting of resisting tensile forces.
Before the pour, the ground beneath your future floor will host a brief, chaotic period of plumbing and electrical work. This is the time to consider all your utility stub-ups. Forgetting a drainage outlet now means renting a jackhammer later.
– Verify all conduits and pipes are capped to prevent concrete intrusion.
– Ensure sleeves for future plumbing are positioned within the formwork boundaries.
– Confirm that support chairs for the reinforcement do not puncture the vapor barrier beneath them.
A common mistake is crushing the vapor barrier when tradesmen walk on the rebar, a problem that can only be avoided by using approved protective materials. Aligning everything now prevents a compromise in the moisture protection we discussed earlier. It is a tedious step, but a necessary one.
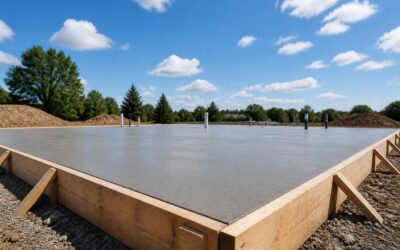
With the forms aligned and the utilities placed, take a final walk around the perimeter. Check the corners for square and ensure the top of the forms is level. The stakes should be driven deep enough to resist the hydraulic push of the concrete during placement. If the forms flex here, they will fail during the pour, and your concrete slab construction project will turn into a very expensive landscaping feature. The goal is a rigid box that holds its shape until the concrete cures.
Installing Reinforcing Steel and Chairs
One misplaced steel chair can silently compromise an entire pour. In concrete slab construction, the rebar grid demands precision; the chairs must hold the reinforcement at the correct depth, typically in the middle third of the slab. If a chair sinks into soft subgrade or punctures the vapour barrier, the structural integrity fades before the concrete cures.
The perimeter forms also dictate how the steel is placed. Keep the reinforcement at least 50 mm away from the forms to ensure proper cover. This spacing prevents corrosion and fire damage.
Before tying the steel, inspect the utility stub-ups. Conduits and pipes must be capped and positioned so they do not displace the chairs.
- Confirm every chair sits on a stable base.
- Verify that no pipe or conduit forces the rebar out of its designated plane.
- Check that the reinforcement does not rest directly on the vapour barrier.
These details turn a routine slab into a dependable foundation.
Embedded Conduits, Pipes, and Sleeves
In concrete slab construction, the formwork rarely earns a second glance. Yet it gives the entire slab its shape. Every form board must be straight, every corner plumb, and every brace anchored against the lateral pressure of a fresh pour. Wet concrete is heavy and restless. It will find a poorly aligned joint and make its displeasure permanent. The result is not always charming.
Reinforcement and utility placement demand the same unglamorous rigour. Embedded conduits, pipes, and sleeves must be positioned before the pour, and they must not disturb the rebar’s designated plane. Cap the stub-ups. Seal the sleeves. Confirm the chairs hold their ground. The discipline of concrete slab construction lives in these details.
Consider the checklist that keeps a pour honest:
- Reinforcement cover is maintained across the full span.
- Embedded pipes and conduits do not displace the steel grid.
- Sleeves and stub-ups are capped against concrete ingress.
Each element performs its role in silence. When they cooperate, the slab emerges true, strong, and unremarkable. That is exactly how a dependable foundation ought to look.
Keyway and Edge Form Details
A missed keyway costs more than a cracked slab. It costs the joint’s entire purpose. In concrete slab construction, the edge form carries that responsibility. The keyway strip, set at mid-depth, creates a groove that transfers shear loads between adjacent pours while allowing them to shift with temperature and settlement.
Reinforcement must stop exactly at the keyway’s mouth. Any steel crossing that point turns a working joint into a rigid bridge. Utility lines follow the same rule. I have seen joints fail because someone let a pipe run straight through the keyed zone. Keep pipes and conduits out of that space entirely, or they become unintended dowels.
- Set the keyway strip with the wider face anchored to the form.
- Brace the edge form every 600 to 900 millimetres to resist pour pressure.
Spacers and Bolster Layout
The success of concrete slab construction depends on small components that are easy to overlook. A spacer or bolster seems like a simple support, yet it dictates whether reinforcement remains where the engineer designed it. In South Africa, where aggregates are sharp and the sun can accelerate setting, poor spacers allow steel to sink into the subgrade or shift sideways during the pour.
For utility placement, the gap between pipes and rebar is not a suggestion. Purpose-made spacers lock onto the reinforcement and hold a consistent cover. Increase bolster density around conduits and sleeves because embedded elements add weight and create voids.
Common layouts on site include:
– Plastic or concrete spacers rated for the slab thickness.
– Bolsters at 600 to 750 millimetre centres for light mesh.
– Reduced spacing of 450 millimetres around pipe penetrations.
Every spacer must rest on a stable base. Soft subgrade defeats the purpose of concrete slab construction, no matter how precisely the steel is tied.
Concrete Pouring and Finishing Operations
Pre-Pour Checklist and Weather Considerations
My first rule for concrete slab construction is to respect the weather. The pour starts with a pre-pour checklist, not when the mixer arrives. Rain within 24 hours can erode the surface cement; wind above 20 km/h speeds up evaporation; temperatures outside 5°C to 32°C alter hydration rates. Check the forecast twice on pour day. Heat causes rapid water loss and shrinkage cracks; cold slows setting and causes frost damage. Stage all tools, crew, and curing supplies beside the forms. A checklist prevents delays:
- Confirm form alignment and bracing.
- Test concrete slump for workability.
- Have tarps and blankets ready for weather shifts.
During concrete pouring and finishing operations, monitor the sky continuously. Stable conditions allow a steady rhythm. A sudden gust demands immediate action.
Transportation and Pumping Methods
Transportation and pumping methods determine whether a perfect mix arrives as a slab or as a pile of rubble. The concrete slab construction site runs on timing. Transit mixers churn the load, but the journey from drum to form is where mistakes happen. Deliveries must arrive at intervals that match the placement crew. Too many trucks and the concrete stiffens in the chute. Too few and you pour cold joints.
Pumping adds another layer of complexity. Boom pumps cover large areas; line pumps snake through tight spaces. Both require a slick mix that moves easily. A dry mix plugs the line. A wet mix segregates at the nozzle. Watch the slump and keep the pump moving steadily.
Consider these ground rules:
- Schedule pumps before the first truck arrives.
- Keep the pipeline flushed and wet.
- Match pump output to crew capacity.
Smooth transport keeps the concrete slab construction predictable. The material only obeys physics.
Screeding and Bullfloating Techniques
Pouring concrete punishes hesitation. The moment the first load lands, screeding and bullfloating become the only things that matter. In concrete slab construction, the crew operates with no room for second thoughts. We never let the surface get ahead of us!
The placement crew watches three things at once:
- The drop rate against the screed speed.
- Low spots before the straightedge passes.
- The mix’s willingness to move.
Screeding drags a straightedge across the wet concrete. It strikes off excess and exposes depressions. The straightedge rides the edge forms or a screed pipe set to height. Work from one end to the other.
Bullfloating follows immediately. It pushes coarse aggregate down and pulls cement paste up. That paste becomes the trowelling bed. Bullfloating closes the voids left by screeding. In concrete slab construction, this step sets up every later pass. Skip it and the surface will tell!
Power Troweling versus Hand Floating
A freshly bullfloated slab has twenty minutes before the surface becomes unworkable. In concrete slab construction, that brief window splits the crew into two groups.
The power trowel spins steel blades across the paste, densifying the surface with each revolution. It works fast, but it demands perfect timing. Too early, and the blades sink. Too late, and they skate! Hand floating moves at a human pace, letting the finisher read every low spot and shade of drying. We have seen finishes ruined by guessing wrong. Around pipes and edge details, the hand float remains the only practical tool.
Many crews use both in sequence, running the machine over the open field and finishing the borders by hand. In concrete slab construction, that combination often yields the most reliable slabs. The choice never comes down to speed alone. It comes down to what the concrete will do before it does it.
Surface Hardeners, Sealing, and Coatings
The surface of a fresh slab is a race against evaporation. In concrete slab construction, the decision to apply a surface hardener comes while the finisher still has control. Hardeners densify the top few millimetres, turning a soft paste into a durable, dust-resistant layer.
For exterior slabs in South Africa’s harsh sun, sealing becomes a preventative measure. A penetrating sealer locks out moisture and chloride ingress, while a coating adds a physical barrier. When to choose one over the other depends on wear:
- Surface hardeners suit industrial floors and garages
- Penetrating sealers protect against water and salt
- Coatings provide slip resistance or chemical protection
The order matters. A hardener goes onto a fresh slab. Sealers and coatings wait until the concrete has cured. Timing separates a satisfied client from a costly repair.
Curing, Joint Placement, and Crack Control
Proper Curing Techniques and Duration
Curing is where many concrete slab construction projects quietly fail. The hydration process demands moisture, and without it, the surface loses strength before it ever earns it. I recommend keeping the slab wet for at least seven days, sometimes longer during the Highveld’s dry winters. Polyethylene sheeting or wet hessian both do the job well.
Joint placement is equally deliberate. Control joints should be cut to one quarter of the slab depth, spaced roughly 24 to 30 times the thickness. Saw cutting should happen within 6 to 12 hours after finishing, before shrinkage cracks appear on their own.
Proper curing techniques and duration directly influence crack control. A slow, steady drying period lets the concrete accommodate internal stress without tearing, and this patience pays off in the long life of any concrete slab construction.
Sawed Control Joints versus Formed Joints
Curing patience pays off, but joint timing matters just as much in concrete slab construction. Sawed control joints are cut after finishing, typically within 6 to 12 hours. They create a clean, straight line that relieves stress before shrinkage cracks form. Formed joints, placed while the concrete is still wet, use a tool or strip to create a weaker plane. They suit smaller slabs where saw access is difficult.
Consider these differences:
- Sawed joints offer smoother edges and earlier crack control.
- Formed joints require less equipment but may leave rougher surfaces.
Both methods work if the depth reaches one quarter of the slab thickness. The key is consistency. A joint that is too shallow forces the crack to wander. For Highveld winters, sawing needs to happen fast, but don’t let the blade tear the aggregate. That balance, not the joint type alone, defines lasting concrete slab construction.
Isolation Joints Around Columns and Walls
Roughly 80 percent of concrete slab construction failures trace back to three avoidable errors: poor curing, shallow joints, and missing isolation details. While the placement of sawed or formed joints controls cracking between defined lines, curing moisture and temperature dictate the entire slab’s integrity. In South Africa’s variable climate, where Highveld winters bring rapid heat loss, the first days after pouring form a critical window. The hydration process needs water; without it, the surface shrinks while the core remains saturated, creating internal tension that destroys long term strength measurements.
Joint placement becomes a method of orchestrating where that tension releases. Beyond control joints, isolation joints deserve distinct attention. These are not scored lines in the slab but full separations between the concrete and adjacent structures. Columns and walls move differently under load and thermal fluctuation. A rigid tie between a floor slab and a column causes shear stress, leading to spalling or a radiating crack pattern near the support. Isolation joint material, such as preformed fiberboard or a compressive sealant, absorbs that differential movement.
– The joint must extend the full slab depth to function properly.
– It lives installed prior to the pour, firmly anchored to the form or column.
– The material must withstand moisture without degrading or compressing permanently.
– Sealant compatibility prevents future adhesive failure.
For a building that will host a vibrating compressor or heavy racking systems, isolation joints are not optional. They protect the slab’s edge and the column’s base simultaneously. The cost of the material is negligible against the cost of a cracked slab corner or a failed load transfer. In concrete slab construction, spacing and depth calculations matter, but understanding where movement originates matters more. A slab pinned to a structural element stops being a separate slab; it becomes a broken restraint. Give it room to breathe.
Sealing and Filling Joint Compounds
A concrete slab construction project in Gauteng demands respect for the first 48 hours. Hydration slows dramatically when the temperature swings between day and night. Curing compounds or insulating blankets keep the surface temperature stable. This prevents the rapid heat loss that causes micro-cracking. Joint placement is a geometry exercise. You map the slab into panels, keeping them square and aligning them with point loads. The goal is to predetermine where movement happens.
Once the slab reaches a compressive strength of 500 psi, you can rout, clean, and seal the joints. An open joint is a liability. Debris fills the gap, water seeps into the subgrade, and the slab expands against a solid object. The result is spalled edges. Filling compounds, like self-leveling polyurea or semi-rigid epoxy, seal the joint while still allowing movement. The process is simple:
- Rout the joint to the specified width and depth.
- Blow out dust and slurry with compressed air.
- Prime the edges and pour the sealant.
Inspection, Repair, and Lifecycle Considerations
Identifying Settlement Cracks and Deterioration
One in every three slabs fails prematurely due to missed settlement cracks. That statistic from local engineering reports warrants serious attention. In concrete slab construction, inspection is not a single event. It is a practice repeated across decades. Settlement cracks appear where soil shifts underneath, often after heavy rains or droughts. Deterioration follows when moisture seeps into those fissures, weakening the matrix from within. Look for these indicators:
- Hairline fractures widening at edges
- Staining from mineral runoff
- A hollow sound when tapped
Repair methods vary. Epoxy injection restores structural bond. Polyurethane foam lifts settled sections. Lifecycle considerations demand annual checks, especially in expansive clay soils common across South Africa. A small crack today becomes a costly replacement tomorrow.
Epoxy Injection and Slab Jacking Repairs
Inspection remains the backbone of any durable concrete slab construction. Without routine checks, even the best repairs become temporary patches. I have seen slabs fail because owners ignored the first signs of movement. A yearly inspection, especially after wet seasons, catches issues before they expand.
When cracks appear, epoxy injection restores the structural bond by filling the fissure under pressure. Slab jacking, on the other hand, lifts settled sections by pumping a slurry beneath the surface. Both methods require clean, stable conditions to succeed.
- Check for widening cracks after heavy rain
- Tap the surface to detect hollow areas
- Look for staining near joints
Lifecycle planning matters as much as the repair itself. In South Africa’s expansive soils, a single event can stress the foundation. Regular inspections reduce the need for slab jacking later. Focus on long-term monitoring, not quick fixes.
Routine Maintenance and Re-sealing Schedules
Concrete slab construction often reveals its true character in the first five years after the pour. In South Africa, the seasonal swelling and shrinking of clay soils stresses every joint. If you leave re-sealing for later, moisture finds a path beneath the slab. I recommend checking joint sealants every six months, after the rainy season and again before summer. A simple cleaning routine also prevents debris from locking joints. When sealants lose adhesion, re-apply them promptly. The typical schedule depends on exposure:
- Interior slabs: re-seal every 3 to 5 years.
- Exposed driveways: check annually, re-seal every 2 years.
- Industrial floors: evaluate quarterly.
Lifecycle planning means budgeting for these tasks. Ignoring the calendar only shifts the cost to repairs. Consistent care extends the service life of the foundation.
Estimating Costs and Budgeting for a Slab Project
A realistic budget for concrete slab construction accounts for the years after the pour. South African clay soils shift with the seasons, so a slab’s actual costs appear slowly. Most owners set aside money for the concrete, but forget the smaller expenses like moisture testing or crack measurement.
Inspection fees are the easiest to skip. A professional survey every few years costs less than one slab jacking procedure. I have seen households ignore a hairline crack for a decade, then face a drainage repair that triples the original estimate.
- Structural engineer’s visit fee
- Repair contingency, usually 10% of the slab budget
- Future joint re-sealing materials
- Monitoring equipment for movement
Budgeting for the procedure means anticipating the lifecycle, not the pour. In South Africa, the wet and dry cycles test every joint. Estimate generously, review quarterly, keep records.
Long-term Durability and Environmental Factors
I have watched hairline cracks turn into R50,000 repairs. Nobody plans a slab to fail, but South African sun and clay take turns punishing your concrete slab construction. A crack that looks like a bad hairline can become a drainage nightmare within three rainy seasons.
- Measure crack width monthly
- Check joint sealant flexibility
- Record drainage patterns after storms
Inspection every two years costs less than one jacking repair. Look for edge curling, surface spalling, and joint gaps. Environmental factors like temperature swings and soil moisture drive most deterioration. Lifecycle thinking means budgeting for resealing and movement monitoring. Durability comes from addressing small issues early, not from a thicker pour.


0 Comments