Planning and Preparation for Slab Projects
Site Assessment and Permitting
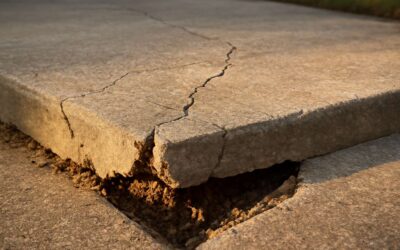
Foundations are the quiet workhorses of any build, and in South Africa a shaky start shows up as cracks and headaches long after the dust has settled. A common stat in DIY circles says more than half of slab projects stumble because the planning stage was skipped.
Planning and site assessment for slab projects isn’t glamorous, but it pays dividends: assess soil type and drainage, read the grade, and map access to utilities. When permitting comes into play, local municipalities require alignment with building regulations and approvals before pouring. Even with your concrete slab diy ambitions, I’ve seen budgets saved when preparation pays for itself.
- Soil bearing, drainage, and slope considerations
- Utility locate, setbacks, and municipal by-laws
- Permitting requirements and SA standards compliance
These considerations set a sturdy stage for any slab project.
Soil Testing and Subgrade Preparation
Subgrade fidelity is the quiet architect of a durable pour, and the numbers don’t lie: more than half of slab failures trace to inadequate soil prep. Planning and Preparation for slab projects starts below the surface, where soil testing dictates the bearing expectations, moisture balance, and compaction targets that follow on pour day.
- Conduct a soil bearing test to estimate load capacity
- Assess moisture content and compaction potential
- Choose a granular base and ensure stable moisture
- Plan drainage to divert water away from the future slab
For concrete slab diy enthusiasts, this groundwork is the difference between a quiet success and a costly wake-up call. Precise readings, disciplined base prep, and tidy drainage translate into a pour that ages with dignity.
Dimensions, Thickness, and Reinforcement Planning
In the workshop dawn, I map the space like a cartographer of floors. A well-planned slab begins with measurements that respect loads, spans, and SA’s sun-bright weather—the kind of reality that makes or breaks a surface. Thoughtful planning can cut crack risk by up to 50%. In concrete slab diy, dimensions, thickness, and reinforcement planning are not afterthoughts but the spell that keeps cracks at bay through every South African season.
Three anchors guide this phase:
- Dimensions aligned with space and flow
- Thickness chosen for loads and context
- Reinforcement layout with spacing and cover
Once these decisions sit solid, the surface ages with dignity, ready for daily use under SA skies.
Drainage and Water Management
In South Africa’s blistering summers and sudden thundershowers, a poorly drained slab writes its own tragedy. Planning and Preparation for Slab Projects must center on drainage—water management as the hinge between ambition and longevity. This is where concrete slab diy begins.
- Gradient and runoff paths away from foundations
- Edge detailing and backfill to keep moisture at bay
- Downspouts and surface grading to prevent pooling
I’ve learned to treat water as a co-creator rather than an adversary; it shapes the project’s rhythm. A thoughtful gradient steps water clear of doors, while surface textures and breathable barriers temper moisture without inviting stagnation. When water is allowed to answer the land’s lay of the terrain, the slab ages with dignity under SA skies.
Budgeting and Timeline
A solid slab doesn’t happen by luck. In SA, 40% of DIY slab projects drift off budget before the first wheelbarrow of concrete hits the site. For concrete slab diy, budgeting is the hinge between dream and durable reality.
Set a baseline for materials, equipment, and costs. Factor in cement, aggregate, steel, forms, and sealants; add mixer rental, delivery fees, and waste. Build in a contingency—weather delays, price swings, and discovery of subgrade quirks. Tie the money to a realistic timeline that respects SA summers and rain squalls.
Consider these budgeting anchors:
- Materials and lead times
- Equipment and delivery costs
- Labor and access considerations
- Contingency fund for surprises
Planning for the long haul keeps ambition aligned with the land, so the slab stands firm under SA skies.
Materials, Mixes, and Tools for Concrete Slabs
Cement Types, Strength, and Curing Requirements
Materials for a sturdy concrete slab start with the cement mix and the right aggregates. In South Africa, CEM I and CEM II blends are common, paired with river sand or crushed stone. Admixtures offer workability and early strength, while water quality matters.
Mix designs for slabs lean toward 20 to 25 MPa grades, with structural or lightweight options depending on loads. Cement types like CEM I and CEM II influence set and durability. Curing requirements rely on climate; evaporation control protects the surface for days.
Tools and finishing gear seal the deal. For the concrete slab diy, the right equipment keeps lines true and edges crisp. Essential items include a screed, trowels, floats, and a mixer or tub for burly mixes. Final touches rely on covers and water.
- Screed and straight edge
- Concrete mixer or tub for small batches
- Steel trowel, magnesium float, finishing float
- Shovel, wheelbarrow, protective gear
Aggregates, Admixtures, and Mix Ratios
“A solid foundation is a canvas for every dream,” they say. Across South Africa’s sunlit horizons, the quiet alchemy of a durable concrete slab begins with aggregates, admixtures, and pure water. River sand or crushed stone provides the backbone, while modern admixtures sharpen workability and early strength. For the home builder pursuing concrete slab diy, these choices shape the slab’s long-day performance under heat and rain.
- Aggregates: river sand or crushed stone tuned to the project
- Admixtures: plasticisers for flow and accelerators for early strength
- Water: clean, impurity-free and free of chlorides
- Mix ratios: a balanced cement-to-aggregate blend for 20–25 MPa grades
- Tools and handling: screed, trowels, floats, and a mixer or tub
These choices pair with careful moisture control to keep surfaces smooth and edges crisp, letting the slab endure SA’s varied climates without losing its quiet resilience.
Formwork, Edging, and Support Materials
Foundations are the quiet engine of a home, turning daylight into shelter. ‘The best foundations make the rest of the day possible,’ a maxim many South African builders carry close. For the concrete slab diy enthusiast, formwork becomes the canvas—timber or steel, edged and braced—ready to cradle what follows. Edging and support materials seal the line where strength enters life.
- Formwork materials: plywood or OSB panels, steel stakes
- Edging and boundary: timber edging, HDPE rails
- Supports: bracing, stakes, ties
- Release agents and fasteners: form oil, nails, screws
Mixes lean on restraint: clean water, balanced cement-to-aggregate, and a touch of modern flow aids for workability. For concrete slab diy projects, the tools—screed, trowels, floats, and a mixer or tub—become an orchestra conductor, guiding the surface to a calm, durable finish under South Africa’s skies.
Tools and Equipment Essentials
“The best foundations make the rest of the day possible,” a trusted maxim among South African builders, anchors this conversation. Materials form the quiet alchemy of shelter: cement, clean aggregates, and water harmonized by care. For concrete slab diy, select quality components and pair them with moisture barriers and curing blankets to cradle the surface as it settles under the South African sun.
Mixes should be lean yet alive—balanced for workability without unnecessary heft. A touch of modern flow aids can ease a gentle pour, while restraint preserves durability and beauty in the finish. The aim is surface calm over raw potential.
Tools and equipment are the conductor’s baton in this performance. A mixer or tub, screed, straightedge, edger, trowel, and floats shape the surface with quiet precision; a wheelbarrow keeps the rhythm steady as the work unfolds. For a concise gear guide, consider the essentials listed below:
- Screed or straightedge
- Trowels and floats
- Mixer or tub
- Wheelbarrow and shovel
- Vibrator or tamping tool
Safety Gear and Handling Best Practices
In the world of concrete slab diy, the margin between a flawless surface and a blemish is often moisture management and your components under the South African sun. Choose sturdy cement, clean aggregates, and water, then pair them with a moisture barrier and curing blanket to cradle the slab as it cures.
Mixes should be lean but lively—workable enough to pour smoothly without unnecessary heft. A hint of modern flow aids can ease the pour, while restraint preserves durability and the finish’s quiet beauty.
Tools are the conductor. A mixer or tub, screed or straightedge, trowels and floats, and a wheelbarrow keep every pass steady. Safety gear and handling best practices are non-negotiable in this craft.
- Safety glasses or goggles
- Protective gloves
- Steel-toe boots
- Hard hat or cap
- Respiratory mask or respirator
- Sunscreen and hydration for SA sun
With these essentials in place, you’re building more than a surface—you’re setting the standard for durable, SA-ready concrete slab diy work.
Pouring, Finishing, and Curing Techniques
Preparing Forms and Subgrade
Pouring a slab is when plans breathe, and the day finally speaks in concrete. In SA light, the formwork and subgrade must stand ready, for they are the quiet stagehand to every pour. Pouring, finishing, and curing techniques unfold like a measured poem, each action hardening into permanence. The concept of concrete slab diy becomes tangible magic—an honest craft that translates ambition into a solid floor beneath your feet.
- Pouring rhythm that respects grade and consolidation
- Finishing texture that balances smoothness and grip
- Curing patience through moisture, shade, and airflow
Preparing forms and subgrade remains the prologue: edges pinned true, the substrate compacted with quiet insistence, and moisture managed as a steward would guard a flame. In South Africa’s climate, shade and breeze temper cure, reminding every builder that patience is the architect of a durable embrace.
Pouring Strategy and Sequence
A disciplined approach to concrete slab diy pours blends physics with artistry. The pouring strategy moves in a steady rhythm, gravity guiding the mix along a planned line while consolidation reveals the slab’s true character. In South Africa, climate shapes the pace.
- Consistent pace to minimize cold joints
- Balance strike-off with float for level
- Finishing that preserves grip without glare
- Moisture-aware curing aligning with shade and humidity
Finishing texture should balance smoothness with grip, especially outdoors. A broomed or matte finish offers slip resistance while keeping the surface calm. Curing remains a quiet partner, preserving strength long after the pour.
Patience and observation guide the journey from pour to permanence, yielding a resilient, honest surface that supports daily life in South Africa’s built environment.
Screeding, Floating, and Troweling
In the realm of concrete slab diy, South Africa’s climate carves the rhythm of the pour. The night speaks in iron teeth and the day answers with heat—an atmosphere that demands patience and respect.
I watch the strategy unfold as gravity guides the mix along a planned line. Screeding becomes a measured breath; the surface tells its truth when the line feel matches the final plane.
- Screeding
- Floating
- Troweling
Finishing should balance smoothness with grip; outdoors, broomed or matte textures offer traction without glare. Curing remains a quiet partner, preserving strength long after the pour.
Moisture, shade, and humidity are co-authors in the story of your slab, guiding how the surface learns to endure the South African built environment.
Control Joints and Crack Prevention
Pouring is the first conversation in concrete slab diy—the gravity of mix, the line it follows, and the South African climate testing patience. Pour during cooler windows and steady handshakes with the formwork keep the mass from buckling, guiding the surface toward a true final plane.
Finishing should balance smoothness with grip; outdoors, broomed or matte textures offer traction without glare. The surface answers the day’s temperament, revealing a durable skin that holds up to foot traffic, weather, and the gentle drama of curing in the South African sun.
Curing remains a quiet partner, preserving strength long after the pour. This is where control joints and crack prevention perform as a choreography—scheduled breaks that respect thermal movement and shrinkage, not as a patch after the fact. Sealants and proper joint sizing keep moisture where it belongs.
- Joint spacing and pattern rationale
- Texture compatibility with traffic
- Moisture management during cure
Curing Methods and Temperature Considerations
Patience and material hold a country’s memory. A survey notes 68% of DIY slabs crack under heat and haste, a reminder that temperature shapes truth. Pour during a cool window with a steady hand, guiding the mass to a true plane. This concrete slab diy moment begins with restraint and reverence for South Africa’s sun.
Finishing should balance smoothness with grip; outdoors, broomed or matte textures offer traction without glare. The surface answers the day’s temperament, revealing a durable skin that endures foot traffic and weather in our climate.
- Air-curing basics
- Moisture control
- Temperature-aware timing
Curing remains a quiet partner, preserving strength long after the pour. This choreography—balancing humidity, shade, and sun—frames the concrete slab diy story. In South Africa’s climate, dew points, radiant heat, and overnight cooling shape how the surface hardens and stays even through the cure.
Troubleshooting and Quality Control
Preventing Cracks: Causes and Mitigation
Troubleshooting and quality control are the unsung heroes of a crack-free project. Small, quiet checks prevent big regrets when the concrete hardens. In the world of concrete slab diy, consistency in texture, color, and cure is not a luxury but a contract with durability.
To keep the narrative elegant and the surface serene, consider these quick observations:
- Crack patterns and their alignment with joints
- Evidence of uneven curing or moisture pockets
- Uniform finishing and form edge stability
A measured approach to QA turns potential flaws into mere anecdotes; when worries surface, a cautious re-evaluation preserves long-term performance. In South Africa, heat and sun can accentuate surface drying, reinforcing the need for steady environment cues.
Surface Defects and Remedies
“The eye spots the fault before the hand touches the tool,” an old tradesman once whispered, and in South Africa’s blazing sun, that truth lands with extra weight. Surface defects in concrete slab diy projects are quiet debt that multiplies if left unchecked.
Common surface defects whisper through the finish—pinhole voids, laitance dusting, and hairline crazing along joints—often signaling moisture pockets or uneven curing beneath. These telltale signs respond to subtle environment cues and finishing tension, not brute force.
- Pinholes and air pockets that distort texture
- Dusting or a dull sheen from laitance
- Fine cracking radiating from joints or edges
Remedies are about gentle adjustment—maintaining consistent surface conditions, guarding moisture, and meshing with the project’s workflow. For enthusiasts, recognizing these cues keeps long-term durability in sight.
Settling and Hollow Spaces Remedies
‘You hear the slab before you see it,’ a veteran masonsman once whispered, and in South Africa’s heat the truth rings loud. Settling and hollow spaces whisper of premature moisture loss and uneven compaction, turning a seemingly solid panel into a debt that demands attention.
Spotting trouble early saves drama later. For the home DIYer pursuing concrete slab diy, watch for these cues:
- Settling sounds or a hollow thud when you walk the slab
- Gaps or dips along edges and joints
- A wavy texture or visible voids under the surface
Remedies lean on gentle quality control—stabilize the environment, guard moisture, and honor the project’s flow. Maintain consistent curing conditions, document anomalies, and align work stages so one early flaw doesn’t bloom into a long-term sag.
Weather and Timing Challenges
Weather can alter drying speed by up to 40% in South Africa’s climate, turning a planned two-day pour into a drawn-out affair. Troubleshooting and quality control in weather and timing challenges demand calm, measured steps. For the keen concrete slab diy enthusiast, controlling the environment is half the battle.
Forecast activity matters more than the shovel. The day’s rhythm is shaped by the forecast, while moisture behavior and ground conditions influence curing outcomes. On-site observations, even subtle shifts in light or breeze, can ripple through the project’s schedule.
- Forecast accuracy affecting the day’s rhythm
- Temperature and humidity shaping curing outcomes
- Wind and moisture dynamics influencing surface behavior
- Sequence considerations in the face of temperature gradients
Anomalies become stories that guide future planning rather than quick fixes.
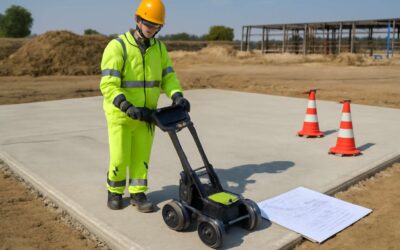
Inspection, Testing, and Documentation
Quality never happens by chance; it follows the steady arithmetic of on-site care. In such projects, troubleshooting and quality control start the moment the formwork is removed and curing temperatures are recorded. Anomalies become stories that sharpen your judgment for the next pour, not alibis for delays.
For concrete slab diy projects, inspection and testing should be calm, methodical rituals: verify surface uniformity, confirm alignment of embedded items, and document environmental conditions that drive cure behavior. Keep a concise record of results, decisions, and deviations—the traceable narrative that protects workmanship and client confidence.
- Inspection notes
- Test results
- Material batch records
- Environmental and curing observations
Maintenance, Longevity, and Upgrades
Sealing, Waterproofing, and Stain Resistance
From the moment the pour cures, the real magic of concrete slab diy begins to show. Maintenance reads like a quiet enchantment: a sealed surface keeps colour bright, resists moisture, and bears footfall with surprising grace under a South African sun.
Longevity hinges on intelligent sealing and careful waterproofing, forming a protective cloak that slows wear and guards against stains. When upgrades are considered, they should feel native to the slab’s character, amplifying durability without muting its essence.
- Stain resistance improvements through impregnating sealers
- Water repellence that reduces surface slickness after rain
- Ease of maintenance and cleaning with a durable finish
These upgrades extend service life while keeping the design honest and timeless.
Repairing Cracks and Surface Damage
‘A well-kept slab forgives time,’ says the elder craftsman, and that truth shines over a South African courtyard. Maintenance isn’t a chore; it’s a ritual that lets concrete slab diy reveal its quiet, enduring grace. I’ve learned the same—small habits, patient hands, steady care.
Longevity hinges on thoughtful sealing and fundamental waterproofing, a protective cloak that slows wear and keeps colour vivid under the SA sun. For this approach, choose a durable finish that reduces upkeep and preserves the slab’s honest charm.
Upgrades should feel native to the slab’s character, amplifying durability without muting its essence. Think in terms of three pathways:
- Stain resistance via impregnating sealers
- Water repellence to curb slickness after rain
- Durable finishes that ease maintenance
Cracks and surface damage tell a story; repairs should honour that narrative, preserving the slab’s honest texture. In the end, maintenance, longevity, and upgrades fuse into a timeless concrete aesthetic.
Cleaning and Aesthetic Upgrades
South African courtyards shimmer under a furnace sun, and a well-kept slab stands as a quiet pillar of endurance. ‘Maintenance is the quiet master of enduring charm,’ the elder craftsman says. I’ve learned this craft ages the patio with dignity.
Daily care keeps it honest: sweep, rinse with mild soap, and watch drainage after rain. Avoid harsh solvents; the surface preserves colour and grip, even through the SA heat.
Longevity favors breathability and measured refreshment. Choose UV-stable finishes that breathe with the slab and respect our climate; this thoughtful cadence reduces wear and keeps the hue vivid.
For concrete slab diy upgrades that align with the slab’s native character, consider these avenues:
- Subtle tint to enhance tones without overpowering
- Gentle, non-slip texture for safety and grip
- Durable, low-maintenance finish with a modest sheen
Long-Term Maintenance Scheduling
Your concrete slab diy isn’t just concrete—it’s a quiet testament to patience. “Maintenance is the quiet master of enduring charm,” the elder craftsman says. For South Africa’s courtyards, a long-term maintenance schedule turns casual care into disciplined craft. Consider these factors shaping upkeep rhythm:
- Climate swings and sun exposure
- Foot traffic and usage patterns
- Moisture movement and drainage shifts
They subtly dictate how the slab ages and when a careful touch is due.
Longevity favors breathability and measured refreshment. Choose UV-stable, breathable finishes that respect our climate; this cadence keeps colour vivid and wear low. In SA heat, the right finish ages gracefully, not chalk-white. In the concrete slab diy world, every finishing choice writes the next chapter.
For concrete slab diy in SA, upgrades that honour the slab’s native character shape the long-term maintenance cadence. A subtle tint that harmonises with surroundings, a forgiving texture for grip, and a durable finish with a modest sheen—these upgrades future-proof both look and upkeep.
- Harmonic tint that complements the environment
- Non-slip texture that remains gentle in heat
- Low-maintenance finish with a soft sheen
Upgrading for Outdoor Use and Retrofitting
South Africa’s courtyards glow when a concrete slab diy meets patience. A well-timed touch of care boosts curb appeal and durability, turning a surface into a quiet storyteller. In the art of concrete slab diy, maintenance is your compass, guiding colour, texture, and resilience through sun, rain, and lively feet.
Longevity favors breathability and measured refreshment. Choose UV-stable, breathable finishes that respect our climate; this cadence keeps colour vivid and wear low. In SA heat, the right finish ages gracefully, not chalk-white.
Upgrading for Outdoor Use and Retrofitting can honour the slab’s native character and set a cadence for years to come.
- Harmonic tint that complements the environment
- Non-slip texture that remains gentle in heat
- Low-maintenance finish with a soft sheen
These choices future-proof both look and upkeep.

0 Comments